Difference between revisions of "Chronomotion"
m |
|||
| (6 intermediate revisions by one other user not shown) | |||
| Line 53: | Line 53: | ||
The GOTO command can be started and interrupted [stopped] on both axes individually. | The GOTO command can be started and interrupted [stopped] on both axes individually. | ||
==Complex Motion Control Sequence== | |||
[[File:Motion-sequence.jpg]] | |||
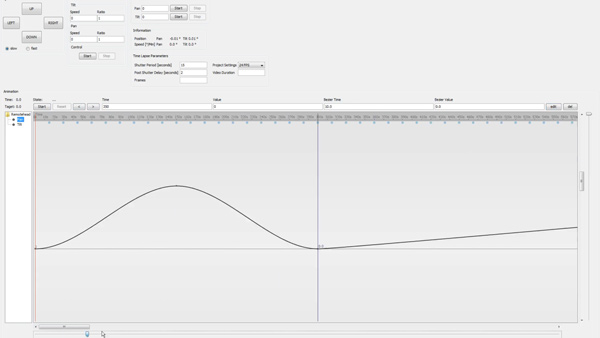
This is the heart of Chronomotion and the reason the software was created after all. | |||
You can create complex motion curves for both pan and tilt axis with an unlimited number of frames and keyframes with Bezier curves. | |||
How often the camera shutter is released is controlled by the field "Shutter Period [seconds]". | |||
[[File:Shutter-frequency.jpg]] | |||
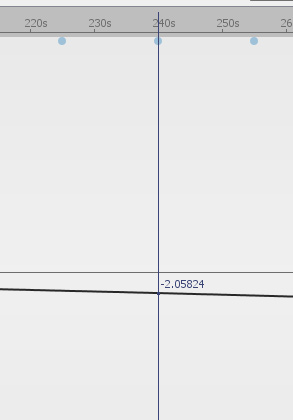
In the motion graph area a blue dot under the time indicator represents one shutter release | |||
The blue line CTI (current time indicator) snaps to every shutter release moment and displays the axis position of this shutter release of the currently shown curve (pan or tilt) in degrees. | |||
== Keyframe Editing == | |||
Adding Keyframes: Double Click into the graph area to create a new keyframe | |||
Keyframes support Drag & Drop | |||
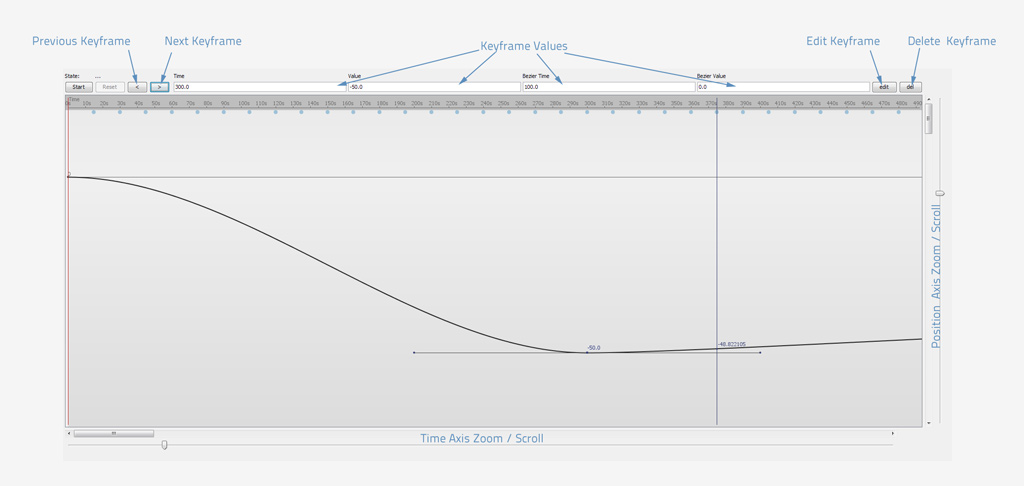
For manual editing of keyframes use the buttons above the graph area: | |||
[[File:Keyframes.jpg]] | |||
==Animation== | |||
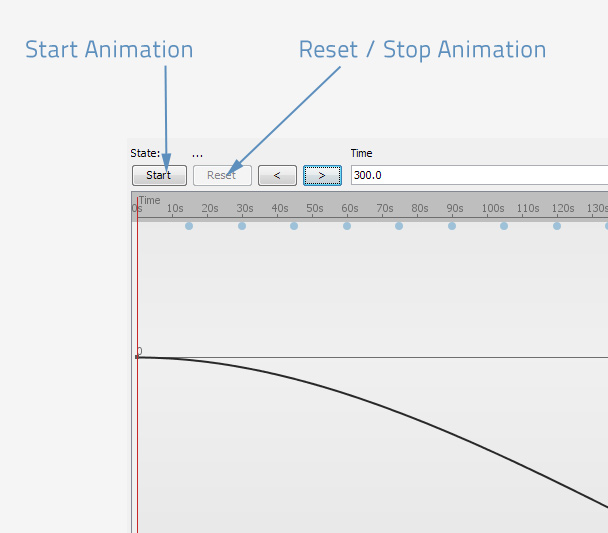
A complex motion control time lapse sequence is called "animation" in this context since it is set up and run in a very similar way as in 3D animation or compositing software. | |||
[[File:Animation.jpg]] | |||
The red line indicates the current time in the animation while it is being shot. | |||
Currently there is no way to pause/resume an animation sequence or start at a specific position in the sequence. | |||
==Known Problems== | |||
* The keyframe animation will stop when no value is available on any of the axis anymore. So make sure both pan and tilt have the last keyframe at the desired animation end position. | |||
* The curve can have 2 values at one point in time due to extreme Bezier settings. Currently Chronomotion does not check for such problems and you need to manually make sure your Bezier values are in order. | |||
* Chronomotion currently does not check how long it takes to move the head to the next frame position. So if you have a short shutter period and a fast moving animation there might not be enough time to move the head to the next frame position before the shutter should be released. Keep an eye on positioning time. Normally for shooting time-lapse that is not of an issue. | |||
* Saving/loading of curves/setups is not possible yet. | |||
=For Developers= | =For Developers= | ||
| Line 61: | Line 101: | ||
[[Category:Project]] | [[Category:Project]] | ||
[[Category:Software]] | [[Category:Software]] | ||
[[category: Project History]] | |||
Latest revision as of 10:27, 15 November 2017
Chronomotion Website: http://www.apertus.org/en/chronomotion
1 Requirements
- Merlin/Orion/Skywatcher remote head
- Computer/Laptop able to run JAVA
- Serial cable with TTL voltage level converter (plus USB to Serial converter) to connect Merlin/Orion/Skywatcher remote head to your computer
2 Installation
Chronomotion Installation Guide
3 Chronomotion Usage Details
3.1 General Information
The head uses DC motors with optical encoders on both axis. It will maintain its knowledge of its current axis position until the head looses power (running out of batteries or turning it off).
The optical encoders are light sensitive so leaving the battery cover open and letting light from the outside fall onto the motor will lead to problems with the encoded position.
The encoders on both axis are extremely accurate (16777216 steps for one turn[360°]) with one step accounting for just 0.000021°. The heads internal GOTO commands (which Chronomotion triggers) are far less accurate with around 0.2° though.
A Chronomotion controlled GOTO routine could be implemented that would achieve far higher accuracy though at slower positioning speed. So far the accuracy provided by the heads internal GOTO commands was more than enough for shooting repeatable timelapse motion control sequences though.
Chronomotion shoots time lapse sequences in Shoot-Move-Shoot (SMS) mode only. Continous motion modes could be implemented if there is the requirement though.
3.2 Establishing a Connection
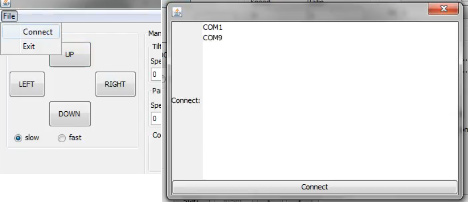
Go to:
File->Connect
Select a COM port (in my case COM9 is the USB Serial adapter) and press the "Connect" Button.
You should see Serial commands being sent and received in Terminal. This means everything connected properly and you can use all other buttons/commands.
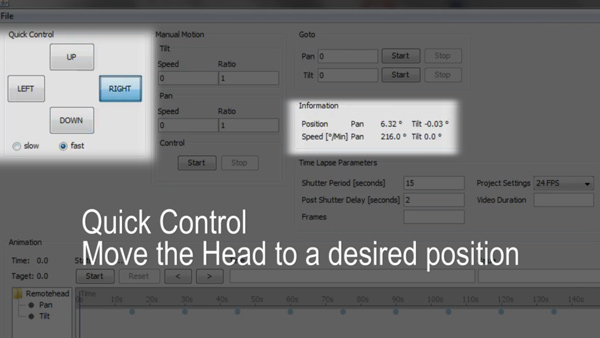
3.3 Manual/Quick Motion
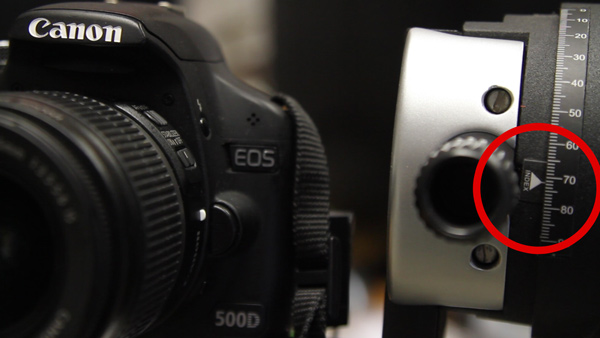
Note: The head will maintain its knowledge of its current axis position until it looses power (running out of batteries or turning it off). Once the head is power cycled it will re-initialize at 0.0° for both pan and title axis.
If you need to realign the head to a specific absolute position after it lost power use the position indicator on the tilt axis and a compass for the pan axis:
For even higher accuracy I recommend to use the mounted camera and compare its frame content in live view mode to the reference images of an earlier time lapse (if it is a repeated motion sequence).
3.4 GOTO Motion
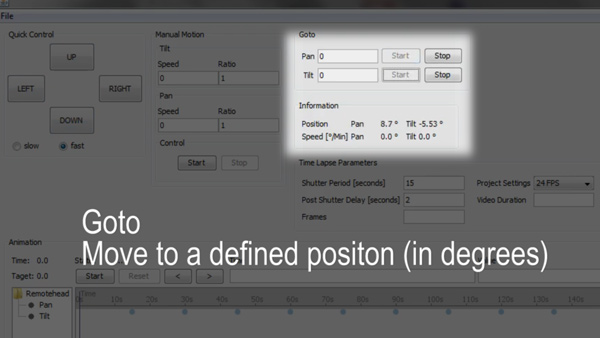
Move the head to a specific position in degrees as fast as possible. This is especially handy if you want to restart a complex motion control sequence and want to move the head back to its start position.
This uses the heads internal GOTO function which has an accuracy of around 0.2° (the head could achieve higher accuracy - its built for telescopes mind you) but not with this GOTO function. The 0.2° are more than good enough for shooting time-lapse sequences. For details see the General Information section above.
The GOTO command can be started and interrupted [stopped] on both axes individually.
3.5 Complex Motion Control Sequence
This is the heart of Chronomotion and the reason the software was created after all.
You can create complex motion curves for both pan and tilt axis with an unlimited number of frames and keyframes with Bezier curves.
How often the camera shutter is released is controlled by the field "Shutter Period [seconds]".
In the motion graph area a blue dot under the time indicator represents one shutter release
The blue line CTI (current time indicator) snaps to every shutter release moment and displays the axis position of this shutter release of the currently shown curve (pan or tilt) in degrees.
3.6 Keyframe Editing
Adding Keyframes: Double Click into the graph area to create a new keyframe
Keyframes support Drag & Drop
For manual editing of keyframes use the buttons above the graph area:
3.7 Animation
A complex motion control time lapse sequence is called "animation" in this context since it is set up and run in a very similar way as in 3D animation or compositing software.
The red line indicates the current time in the animation while it is being shot.
Currently there is no way to pause/resume an animation sequence or start at a specific position in the sequence.
3.8 Known Problems
- The keyframe animation will stop when no value is available on any of the axis anymore. So make sure both pan and tilt have the last keyframe at the desired animation end position.
- The curve can have 2 values at one point in time due to extreme Bezier settings. Currently Chronomotion does not check for such problems and you need to manually make sure your Bezier values are in order.
- Chronomotion currently does not check how long it takes to move the head to the next frame position. So if you have a short shutter period and a fast moving animation there might not be enough time to move the head to the next frame position before the shutter should be released. Keep an eye on positioning time. Normally for shooting time-lapse that is not of an issue.
- Saving/loading of curves/setups is not possible yet.
