Difference between revisions of "AXIOM Beta/Enclosures"
| Line 44: | Line 44: | ||
Open Todos: | Open Todos: | ||
*Draw holes for Emount bayonet ring screws | *Draw holes for Emount bayonet ring screws | ||
*Sensor plane knob and label | *Sensor plane knob and label | ||
==== E mount FFD verification ==== | |||
[[File:AXIOM-Beta-conpact-FFD-path-V01.jpg | 800px]] | |||
---- | ---- | ||
Revision as of 13:36, 30 June 2018
1 Simple Enclosure
The Simple Enclosure is meant to wrap a "skin" around the camera's electronics and CNC milled metal skeleton parts. The Simple Enclosure is designed in a way that can be produced with any consumer 3d printer. The design is not finished yet, please help finish and test it.

2 Transparent Enclosure
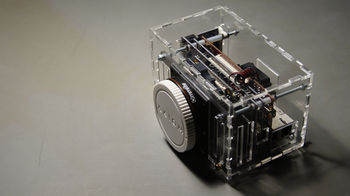
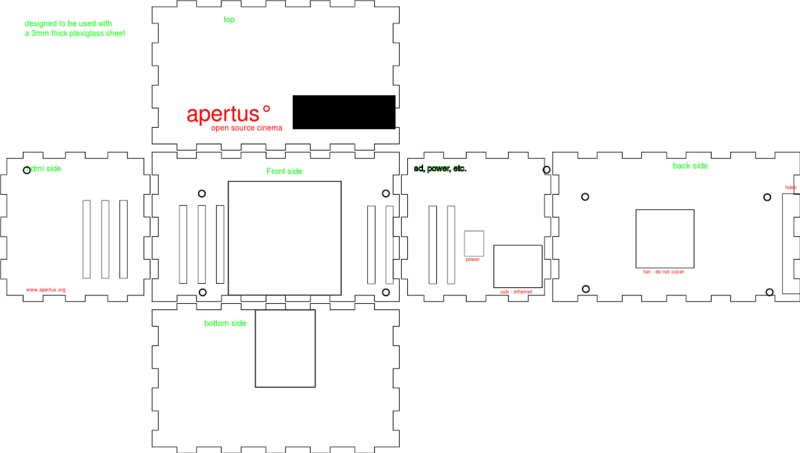
A transparent enclosure is useful for showcasing the camera's printed circuit boards and for allowing to understand quickly what may or may not be going on simply by looking at the camera's status LEDs. The design is made so it can be laser cut with a 3mm thick acrylic glass. Acrylic glass comes is many variations and colors and could also be used to print logos or text labels on the exterior.
Simple transparent enclosure for the AXIOM Beta, version 0.2.
Key : Black => to be cut ; Red => to be engraved ; Green => comments (not to be cut or engraved)
Open and edit the above image with Inkscape or similar.
Note: There may be scope for improvement by making the case slightly bigger (few mm wider for the front and back side), so that the HDMI cable can fit nicely in the enclosure (and you don't need to shave some plastic off the cable). If you make any alterations please update this page with modifications accordingly.
3 AXIOM Beta Compact Enclosure
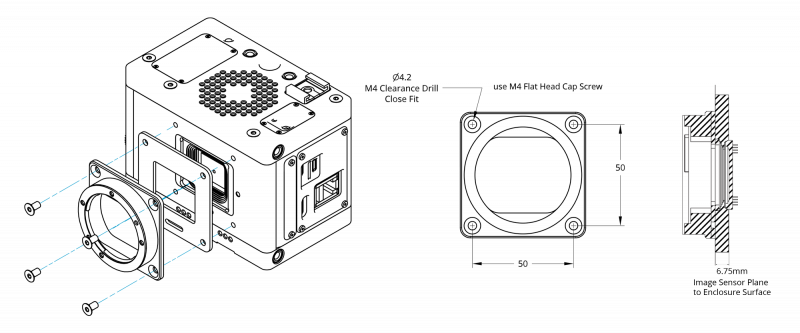
To be CNC milled from aluminum, ceramic coated or anodized
Design still in progress - not finished yet.
All dimensions are in millimeter.
Labels/logos will be pad printed.
Onshape 3D CAD: https://cad.onshape.com/documents/73226709ded01ea10250d8e1/w/f6bfcb79ea86c0939ee114ee/e/e7581285bfd3e966f937c5dd
Open Todos:
- Draw holes for Emount bayonet ring screws
- Sensor plane knob and label
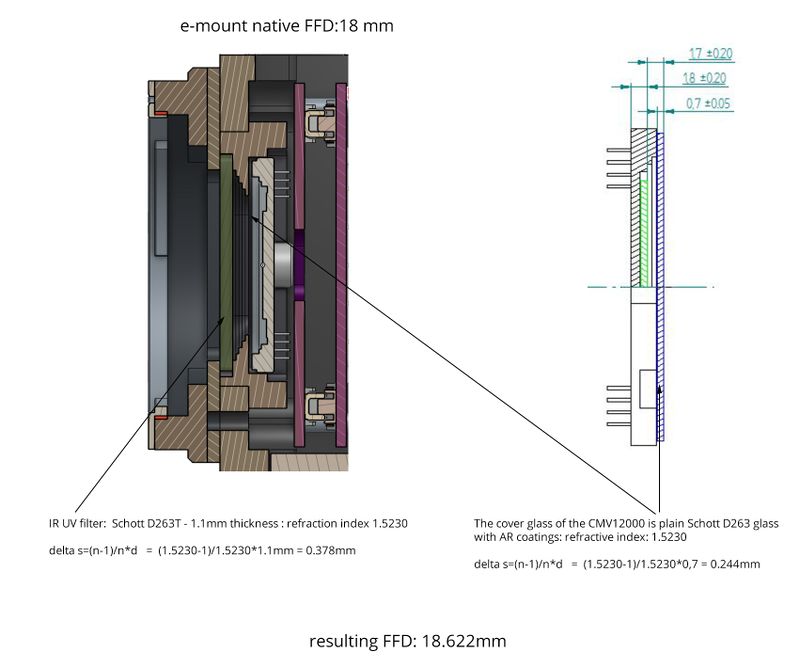
3.1 E mount FFD verification
3.2 IR/UV Cut-off Filter
The visible spectrum that humans can see ranges from 380 - 750 nm.
Currently we are shipping Dev Kits with Haida Pro II MC Digital Slim UV / IR 390nm / 750nm filters.
Hoya filters offer a narrower band of 390 nm - 700 nm - will need to be tested how it impacts less red tones.
http://www.optics-online.com/IRC.asp?PN=IRC30-50x50 50x50mm for 39$ for sample (volume pricing likely lower and on request), 1.5mm thickness
UQG Optics offer 40x40x1.1mm UV/IR Cut off filters with 400 - 690nm bandpass
3.3 Thread Inserts
We want to use thread inserts instead of cutting threads into the aluminum ( -> stronger, less production steps, easier to replace thread insert when damaged later):
Ensat from Kerb Konus seems very suitable:
http://www.kerbkonus.de/proddb/assistent.php?lang=en&a=presel_ds&ds=30
UNC 1/4-20 Ensat SB: http://kerbkonus.de/proddb/tecsheet.php?itemno=307000525160&status=ensat-sb&ds=20&gewinde=525&lang=en&pgc=3070
UNC 3/8-16 Ensat SB: http://kerbkonus.de/proddb/tecsheet.php?itemno=307000637100&status=ensat-sb&ds=20&gewinde=637&lang=en&pgc=3070
UNC 1/4-20 ~ 1€ / pcs (excl. taxes)
UNC 3/8-16 ~ 2.50€ / pcs (excl. taxes)
M3x6 ~ 0.44€ / pcs (excl. taxes)
M4x8 ~ 0.55€ / pcs (excl. taxes)
M5x10 ~ 0.60€ / pcs (excl. taxes)
4 Enclosures and Temperatures
In a closed case it's all about the air flow, so you need to carefully consider where the air enters and leaves the case. Ventilating out through holes above the fan is recommended. It's best to make a sort of wind-tunnel effect if you like. If you simply put a few 'holes' at the back and have a gap between fan and case, the hot air will mostly circulate inside the case, which is not what you want.
It's also recommended to measure various temperatures on the camera and monitor them during use with and without case.
./zynq_info.sh
... will give you the zynq temp,
cat /sys/class/hwmon/hwmon0/temp[0-9]_input
... will give you power board temp
cmv_reg 127
... will give the temperature of the sensor.
The zynq will work relatively fine up to 90°C, although that is a little high for normal use. For the sensor you want to keep temperature quite low - typically not more than a few degrees above room temperature, so adding holes or slits close to the sensor is a good idea.
Always keep in-take holes/slits at the bottom or at least bottom side, because it aids natural convection. As a rule of the thumb, for intake you want to have about 1.5-2x the area you have for the exhaust (in total, which is the inside area of the fan). If you have too little intake, the fan gets slowed down, if you have to much, cooling will be ineffective.
5 General Enclosure Design Topics
From Labs:
Axiom Beta new enclosure and labeling
6 Legacy
Switchable ND Filters not planned currently


