AXIOM Beta/AXIOM Beta Software
Note: Some of the instructions we have prepared are written in a way they can also be followed by people without advanced technical knowledge. If you are more of a "techie", please keep this in mind and skip or ignore the steps or passages which deal with information you already know.
Hey very nice site!! Man .. Beautiful .. Amazing .. I will bookmark your blog and take the feeds alsoI am happy to find a lot of useful info here in the post, we need work out more techniques in this regard, thanks for sharing. . . . . . kcbefdeeedcedgee
1 Start the camera
As development of the Beta continues the camera will initialize all systems and train the sensor communication automatically when powered on, but for now you will have to manually start this yourself.
Run the following command:
./kick_manual.sh
You will see a lot of output, the tail of it is below.
..
mapped 0x8030C000+0x00004000 to 0x8030C000.
mapped 0x80000000+0x00400000 to 0xA6961000.
mapped 0x18000000+0x08000000 to 0x18000000.
read buffer = 0x18390200
selecting RFW [bus A] ...
found MXO2-1200HC [00000001001010111010000001000011]
[root@beta ~]#
If you look at the back of the camera you will now see a blue LED near the top flashing very fast - this indicates everything is now running.
If you turn the camera off when you turn it back on you will need to re-run this command.
2 Capture an image
For writing uncompressed full resolution full bitdepth raw image the AXIOM Beta uses a software called cmv_snap3.
It is located in the /root/ directory and writes the images data directly to STDOUT.
cmv_snap3 writes images in the RAW12 format. Writing one image takes a few seconds depending on where the image is written to so this method is not viable for recording video footage other than timelapse.
2.1 Documentation
The following parameters are available:
./cmv_snap3 -h
This is ./cmv_snap3 V1.10
options are:
-h        print this help message
-8        output 8 bit per pixel
-2        output 12 bit per pixel
-d        dump buffer memory
-b        enable black columns
-p        prime buffer memory
-r        dump sensor registers
-t        enable cmv test pattern
-z        produce no data output
-e <exp>  exposure times
-v <exp>  exposure voltages
-s <num>  shift values by <num>
-S <val>  writer byte strobe
-R <fil>  load sensor registers
2.2 Examples
Images can be written directly to the cameras internal micro SD card like this (10 milliseconds exposure time, 16bit):
./cmv_snap3 -e 10ms > image.raw16
Write image plus metadata (sensor configuration) to cameras internal micro SD card (20 milliseconds exposure time, 12bit):
./cmv_snap3 -2 -r -e 20ms > image.raw12
You can also use cmv_snap3 to change to exposure time (to 5 milliseconds in this example) without actually capturing an image, for the that -z parameter is used to not produce any data output:
./cmv_snap3 -z -e 5ms
That cmv_snap3 writes data to STDOUT makes it very versatile, we can for example capture images from and to a remote Linux machine connected to the Beta via Ethernet easily (lets assume the AXIOM Betas camera IP is set up as: 192.168.0.9 - SSH access has to be set up for this to work with a keypair)
ssh root@192.168.0.9 "./cmv_snap3 -2 -r -e 10ms" > snap.raw12
To pipe the data into a file and display it at the same time with imagemagick on a remote machine:
ssh root@192.168.0.9 "./cmv_snap3 -2 -r -e 10ms" | tee snap.raw12 | display -size 4096x3072 -depth 12 gray:-
Use imagemagick to convert raw12 file into a color preview image:
cat test.raw12 | convert \( -size 4096x3072 -depth 12 gray:- \) \( -clone 0 -crop -1-1 \) \( -clone 0 -crop -1+0 \) \( -clone 0 -crop +0-1 \) -sample 2048x1536 \( -clone 2,3 -average \) -delete 2,3 -swap 0,1 +swap -combine test_color.png
With raw2dng compiled inside the camera you can capture images directly to DNG, without saving the raw12:
./cmv_snap3 -2 -b -r -e 10ms | raw2dng snap.DNG
Note: Supplying exposure time as parameter is required otherwise cmv_snap3 will not capture an image. The exposure time can be supplied in "s" (seconds), "ms" (milliseconds), "us" (microseconds) and "ns" (nanoseconds). Decimal values also work (eg. "15.5ms").
3 Overlay Images
Full HD framebuffer that can be altered from the Linux userspace and is automatically "mixed" with the real time video from the image sensor.
The overlay could also be used to draw live histograms/scopes/HUD.
Convert 24bit PNG (1920x1080 pixels) with transparency to AXIOM Beta raw format:
convert input.png rgba:output.raw
clear overlay:
./mimg -a -o -P 0
load monochrome overlay:
./mimg -o -a file.raw
load color overlay:
./mimg -O -a file.raw
enable overlay:
gen_reg 11 0x0104F000
disable overlay:
gen_reg 11 0x0004F000
4 Misc Scripts
Display voltages and current flow:
./pac1720_info.sh
Output:
ZED_5V        	5.0781 V [2080] 	+29.0625 mV [2e8]   +968.75 mA
BETA_5V       	5.1172 V [20c0] 	+26.6016 mV [2a9]   +886.72 mA
HDN           	3.2422 V [14c0] 	 -0.0391 mV [fff]     -1.30 mA
PCIE_N_V      	3.2422 V [14c0] 	 -0.0391 mV [fff]     -1.30 mA
HDS           	3.2422 V [14c0] 	 +0.0000 mV [000]     +0.00 mA
PCIE_S_V      	3.2422 V [14c0] 	 -0.0391 mV [fff]     -1.30 mA
RFW_V         	3.2812 V [1500] 	 +0.2734 mV [007]     +9.11 mA
IOW_V         	3.2422 V [14c0] 	 +0.0000 mV [000]     +0.00 mA
RFE_V         	3.2812 V [1500] 	 +0.2344 mV [006]     +7.81 mA
IOE_V         	3.2812 V [1500] 	 +0.0781 mV [002]     +2.60 mA
VCCO_35       	2.5000 V [1000] 	 +0.6641 mV [011]    +22.14 mA
VCCO_13       	2.4609 V [ fc0] 	 +1.2500 mV [020]    +41.67 mA
PCIE_IO       	2.4609 V [ fc0] 	 -0.0391 mV [fff]     -1.30 mA
VCCO_34       	2.4609 V [ fc0] 	 +0.8203 mV [015]    +27.34 mA
W_VW          	1.9922 V [ cc0] 	 -0.0781 mV [ffe]     -2.60 mA
N_VW          	3.1641 V [1440] 	 +0.0000 mV [000]     +0.00 mA
N_VN          	1.8750 V [ c00] 	+15.4297 mV [18b]   +514.32 mA
N_VE          	3.1641 V [1440] 	 +0.0000 mV [000]     +0.00 mA
E_VE          	1.9922 V [ cc0] 	 -0.0391 mV [fff]     -1.30 mA
S_VE          	1.9531 V [ c80] 	 +0.0000 mV [000]     +0.00 mA
S_VS          	2.9297 V [12c0] 	 +0.3906 mV [00a]    +13.02 mA
S_VW          	1.9922 V [ cc0] 	 -0.1562 mV [ffc]     -5.21 mA
Read Temperature on Zynq:
./zynq_info.sh
Output:
ZYNQ Temp 49.9545 °C
5 Firmware and Generator, HDMI Output
For the firmware there are two modes available, the 30Hz and 60Hz variant. You can switch between them quite easily.
cmv_hdmi3.bit is the FPGA bitstream loaded for the HDMI interface. We use symlinks to switch this file easily.
Before doing this, don't forget to check if the files (cmv_hdmi3_60.bit or cmv_hdmi3_30.bit) really exist in the /root folder.
5.1 Enable 1080p60 Mode
rm -f cmv_hdmi3.bit
ln -s cmv_hdmi3_60.bit cmv_hdmi3.bit
sync
reboot now
5.2 Enable 1080p30 Mode
rm -f cmv_hdmi3.bit
ln -s cmv_hdmi3_30.bit cmv_hdmi3.bit
sync
reboot now
5.3 Generator and HDMI Output
Independet of the firmware you can switch the rate of the generator. In setup.sh you can change the generator resolution and framerate.
./gen_init.sh 1080p60
./gen_init.sh 1080p50
./gen_init.sh 1080p25
To enable the shogun mode, which is only possibly by current hardware:
./gen_init.sh 1080p60
In Shogun mode, the exposure (shutter) is synced to the output frame rate, but can be a multiple, i.e. with 60FPS output, it can be 60, 30, 20, 15, 12, ... The exposure time (shutter angle if divided by FPS) is entirely controlled by the sensor at the moment.
Note that the firmware controls the shutter, not the generator.
In the future, this will be combined and processed by only one piece of software.
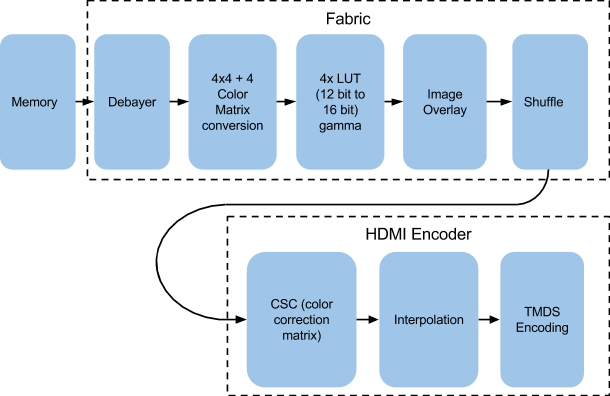
6 Image Processing Pipeline
Draft pipeline taken from AXIOM Alpha for now.
Image Acquisition Pipeline:
HDMI Image Processing Pipeline:
6.1 Image Processing Nodes
6.1.1 Debayering
A planned feature is to generate this FPGA code block with "dynamic reconfiguration" meaning that the actual debayering algorithm can be replaced at any time by loading a new FPGA binary block at run-time. This tries to simplify creating custom debayering algorithms with a script like programming language that can be translated to FPGA code and loaded into the FPGA dynamically for testing.
6.1.2 Peaking Proposal
Peaking marks high image frequency areas with colored dot overlays. These marked areas are typically the ones "in-focus" currently so this is a handy tool to see where the focus lies with screens that have lower resolution than the camera is capturing.
Handy Custom Parameters:
- color
- frequency threshold
Potential Problems:
- there are sharper and softer lenses so the threshold depends on the glass currently used. For a sharp lens the peaking could show areas as "in-focus" if they actually aren't and for softer lenses the peaking might never show up at all because the threshold is never reached
6.1.3 Image Blow Up / Zoom Proposal
Digital zoom into the center area of the image to check focus.
As extra feature this zoomed area could be moved around the full sensor area.
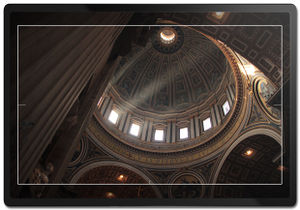
This feature is also related to the "Look Around" where the viewfinder sees a larger image area than is being output to the clean-feed.
This re-sampling method to scale up/down an image in real-time can be of rather low quality (nearest neighbor/bilinear/etc.) as it is only for preview purposes.
7 Tools
7.1 cmv_reg
Get and Set CMV12000 image sensor registers (CMV12000 sports 128x16 Bit registers).
Details are in the sensor datasheet: https://github.com/apertus-open-source-cinema/beta-hardware/tree/master/Datasheets
Examples:
Read register 115 (which contains the analog gain settings):
cmv_reg 115
Return value:
0x00
Means we are currently operating at analog gain x1 = unity gain
Set register 115 to gain x2:
cmv_reg 115 1
7.2 set_gain.sh
Set gain and related settings (ADC range and offsets).
./set_gain.sh 1
./set_gain.sh 2
./set_gain.sh 3/3 # almost the same as gain 1
./set_gain.sh 3
./set_gain.sh 4
7.3 gamma_conf.sh
Set the gamma value:
./gamma_conf 0.4
./gamma_conf 0.9
./gamma_conf 1
./gamma_conf 2
7.4 Setting Exposure Time
To set the exposure time use the cmv_snap3 tool with -z parameter (this will tell the software to not save the image):
./cmv_snap3 -e 9.2ms -z
Note: The exposure time can be supplied in "s" (seconds), "ms" (milliseconds), "us" (microseconds) and "ns" (nanoseconds). Decimal values also work (eg. "15.5ms").
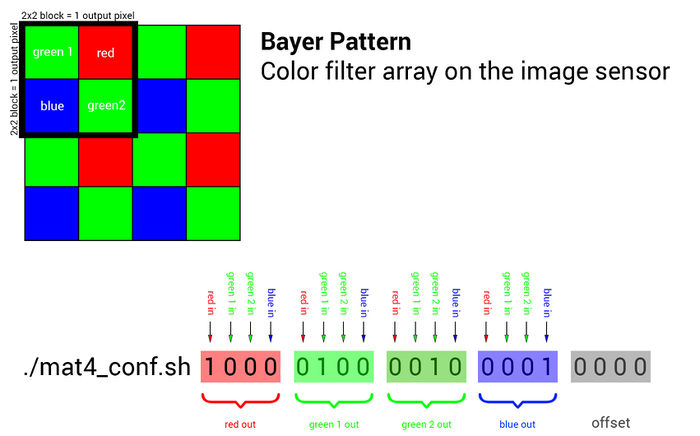
7.5 mat4_conf.sh
Read the details about the Matrix Color Conversion math/implementation.
To set the 4x4 color conversion matrix, you can use the mat4_conf.sh script:
The default configuration:
./mat4_conf.sh 1 0 0 0 0 1 0 0 0 0 1 0 0 0 0 1 0 0 0 0
This 4x4 conversion matrix is a very powerful tool and allows to do things like mixing color channels, reassigning channels, applying effects or doing white balancing.
TODO: order is blue, green, red!
7.5.1 4x4 Matrix Examples:
./mat4_conf.sh  1 0 0 0  0 1 0 0  0 0 1 0  0 0 0 1    0 0 0 0   # unity matrix but not optimal as both green channels are processed separately
./mat4_conf.sh  1 0 0 0  0 0.5 0.5 0  0 0.5 0.5 0  0 0 0 1    0 0 0 0   # the two green channels inside each 2x2 pixel block are averaged and output on both green pixels
./mat4_conf.sh  0 0 0 1  0 1 0 0  0 0 1 0  1 0 0 0    0 0 0 0   # red and blue are swapped
./mat4_conf.sh  1 0 0 0  0 1 0 0  0 0 1 0  0 0 0 1    0.5 0 0 0    # red 50% brigther
./mat4_conf.sh  1 0 0 0  0 1 0 0  0 0 1 0  0 0 0 1.5    0 0 0 0    # blue multiplied with factor 1.5
./mat4_conf.sh  .25 .25 .25 .25  .25 .25 .25 .25  .25 .25 .25 .25  .25 .25 .25 .25    0 0 0 0    # black/white
./mat4_conf.sh  -1 0 0 0  0 -0.5 -0.5 0  0 -0.5 -0.5 0  0 0 0 -1    1 1 1 1    # negative
7.6 Clipping
scn_reg 28 0x00 # deactivate clipping
scn_reg 28 0x10 # activate low clipping
scn_reg 28 0x20 # activate high clipping
scn_reg 28 0x30 # activate high+low clipping
8 General Info
Stop HDMI live stream:
fil_reg 15 0
Start HDMI live stream:
fil_reg 15 0x01000100
8.1 Operating System
At this moment we were able to reuse an Arch Linux image for the Zedboard on the Microzed. To do so, some software such as the FSBL and uboot were added. More information can be found here: http://stefan.konink.de/contrib/apertus/ I will commit myself on the production of a screencast of the entire bootstrap proces from the Xilinx software to booting the MicroZed.
I would suggest running Arch Linux on the AXIOM Beta for development purposes. If we need to shrink it down that will be quite trivial. Obviously we can take the embedded approach from there, as long as we don't fall in the trap of libc implementations with broken threading.
8.1.1 Packet Manager Pacman
Update all package definitions and the database from the Internet:
pacman -Sy
Install lighttp webserver on the Beta:
pacman -S lighttpd
Install PHP on the Beta:
pacman -S php php-cgi
Follow these instructions: https://wiki.archlinux.org/index.php/lighttpd#PHP
Start the webserver:
systemctl start lighttpd
8.2 Moving Image Raw Recording/Processing
8.2.1 Enable Raw recording mode
Note: This experimental raw mode works only in 1080p60 (A+B Frames) and is only tested with the Atomos Shogun currently.
To measure the required compensations with a different recorder follow this guide: this guide
This mode requires darkframes which are created in the course of a camera Factory Calibration. Early Betas are not calibrated yet - this step needs to be completed by the user.
Enable raw recording mode:
./hdmi_rectest.sh
if you get an error report like this:
Traceback (most recent call last):
  File "rcn_darkframe.py", line 17, in <module>
    import png
ImportError: No module named 'png'
Make sure the Beta is connected to the Internet via Ethernet and run:
pip install pypng
8.2.2 Processing
Postprocessing software to recover the raw information (DNG sequences) is on github: https://github.com/apertus-open-source-cinema/misc-tools-utilities/tree/master/raw-via-hdmi
required packages: ffmpeg build-essentials
Mac requirements for compiling: gcc4.9(via homebrew):
brew install homebrew/versions/gcc49
also install ffmpeg
To do all the raw processing in one single command (after ffmpeg codec copy processing):
./hdmi4k INPUT.MOV - | ./raw2dng --fixrnt --pgm --black=120 frame%05d.dng
8.2.3 hdmi4k
Converts a video file recorded in AXIOM raw to a PGM image sequence and applies the darkframe (needs to be created beforehand).
Currently clips must go through ffmpeg before hdmi4k can read them:
ffmpeg -i CLIP.MOV -c:v copy OUTPUT.MOV
To cut out a video between IN and OUT with ffmpeg but maintaing the original encoding data:
ffmpeg -i CLIP.MOV -ss IN_SECONDS -t DURATION_SECONDS -c:v copy OUTPUT.MOV
hdmi4k
HDMI RAW converter for Axiom BETA

Usage:
  ./hdmi4k clip.mov
  raw2dng frame*.pgm [options]

Calibration files:
  hdmi-darkframe-A.ppm, hdmi-darkframe-B.ppm:
  averaged dark frames from the HDMI recorder (even/odd frames)

Options:
-                   : Output PGM to stdout (can be piped to raw2dng)
--3x3               : Use 3x3 filters to recover detail (default 5x5)
--skip              : Toggle skipping one frame (try if A/B autodetection fails)
--swap              : Swap A and B frames inside a frame pair (encoding bug?)
--onlyA             : Use data from A frames only (for bad takes)
--onlyB             : Use data from B frames only (for bad takes)
8.2.4 raw2dng
Converts a PGM image sequence to a DNG sequence.
DNG converter for Apertus .raw12 files

Usage:
  ./raw2dng input.raw12 [input2.raw12] [options]
  cat input.raw12 | ./raw2dng output.dng [options]

Flat field correction:
 - for each gain (N=1,2,3,4), you may use the following reference images:
 - darkframe-xN.pgm will be subtracted (data is x8 + 1024)
 - dcnuframe-xN.pgm will be multiplied by exposure and subtracted (x8192 + 8192)
 - gainframe-xN.pgm will be multiplied (1.0 = 16384)
 - clipframe-xN.pgm will be subtracted from highlights (x8)
 - reference images are 16-bit PGM, in the current directory
 - they are optional, but gain/clip frames require a dark frame
 - black ref columns will also be subtracted if you use a dark frame.

Creating reference images:
 - dark frames: average as many as practical, for each gain setting,
   with exposures ranging from around 1ms to 50ms:
        raw2dng --calc-darkframe *-gainx1-*.raw12
 - DCNU (dark current nonuniformity) frames: similar to dark frames,
   just take a lot more images to get a good fit (use 256 as a starting point):
        raw2dng --calc-dcnuframe *-gainx1-*.raw12
   (note: the above will compute BOTH a dark frame and a dark current frame)
 - gain frames: average as many as practical, for each gain setting,
   with a normally exposed blank OOF wall as target, or without lens
   (currently used for pattern noise reduction only):
        raw2dng --calc-gainframe *-gainx1-*.raw12
 - clip frames: average as many as practical, for each gain setting,
   with a REALLY overexposed blank out-of-focus wall as target:
        raw2dng --calc-clipframe *-gainx1-*.raw12
 - Always compute these frames in the order listed here
   (dark/dcnu frames, then gain frames (optional), then clip frames (optional).

General options:
--black=%d          : Set black level (default: 128)
                      - negative values allowed
--white=%d          : Set white level (default: 4095)
                      - if too high, you may get pink highlights
                      - if too low, useful highlights may clip to white
--width=%d          : Set image width (default: 4096)
--height=%d         : Set image height
                      - default: autodetect from file size
                      - if input is stdin, default is 3072
--swap-lines        : Swap lines in the raw data
                      - workaround for an old Beta bug
--hdmi              : Assume the input is a memory dump
                      used for HDMI recording experiments
--pgm               : Expect 16-bit PGM input from stdin

--lut               : Use a 1D LUT (lut-xN.spi1d, N=gain, OCIO-like)

--totally-raw       : Copy the raw data without any manipulation
                      - metadata and pixel reordering are allowed.

Pattern noise correction:
--rnfilter=1        : FIR filter for row noise correction from black columns
--rnfilter=2        : FIR filter for row noise correction from black columns
                      and per-row median differences in green channels
--fixrn             : Fix row noise by image filtering (slow, guesswork)
--fixpn             : Fix row and column noise (SLOW, guesswork)
--fixrnt            : Temporal row noise fix (use with static backgrounds; recommended)
--fixpnt            : Temporal row/column noise fix (use with static backgrounds)
--no-blackcol-rn    : Disable row noise correction from black columns
                      (they are still used to correct static offsets)
--no-blackcol-ff    : Disable fixed frequency correction in black columns

Flat field correction:
--dchp              : Measure hot pixels to scale dark current frame
--no-darkframe      : Disable dark frame (if darkframe-xN.pgm is present)
--no-dcnuframe      : Disable dark current frame (if dcnuframe-xN.pgm is present)
--no-gainframe      : Disable gain frame (if gainframe-xN.pgm is present)
--no-clipframe      : Disable clip frame (if clipframe-xN.pgm is present)
--no-blackcol       : Disable black reference column subtraction
                      - enabled by default if a dark frame is used
                      - reduces row noise and black level variations
--calc-darkframe    : Average a dark frame from all input files
--calc-dcnuframe    : Fit a dark frame (constant offset) and a dark current frame
                      (exposure-dependent offset) from files with different exposures
                      (starting point: 256 frames with exposures from 1 to 50 ms)
--calc-gainframe    : Average a gain frame (aka flat field frame)
--calc-clipframe    : Average a clip (overexposed) frame
--check-darkframe   : Check image quality indicators on a dark frame

Debug options:
--dump-regs         : Dump sensor registers from metadata block (no output DNG)
--fixpn-dbg-denoised: Pattern noise: show denoised image
--fixpn-dbg-noise   : Pattern noise: show noise image (original - denoised)
--fixpn-dbg-mask    : Pattern noise: show masked areas (edges and highlights)
--fixpn-dbg-col     : Pattern noise: debug columns (default: rows)
--export-rownoise   : Export row noise data to octave (rownoise_data.m)
--get-pixel:%d,%d   : Extract one pixel from all input files, at given coordinates,
                      and save it to pixel.csv, including metadata. Skips DNG output.
Example:
./raw2dng --fixrnt --pgm --black=120 frame%05d.dng
8.2.4.1 Compiling raw2dng
Compiling raw2dng on a 64bit system requires the gcc-multilib package
Ubuntu:
sudo apt-get install gcc-multilib
openSUSE:
sudo zypper install gcc-32bit libgomp1-32bit
8.2.5 EDL Parser
This script can take EDLs to reduce the raw conversion/processing to the essential frames that are actually used in an edit. This way a finished video edit can be converted to raw DNG sequences easily.
Requirements: ruby
puts "BEFORE EXECUTION, PLS FILL IN YOUR WORK DIRECTORY IN THE SCRIPT (path_to_workdir)"


puts "#!/bin/bash"
i=0
ffmpeg_cmd1 = "ffmpeg -i "

tc_in = Array.new
tc_out = Array.new
clip = Array.new

file = ARGV.first
ff = File.open(file, "r")

ff.each_line do |line|
	clip << line.scan(/NAME:\s(.+)/)
	tc_in << line.scan(/(\d\d:\d\d:\d\d:\d\d).\d\d:\d\d:\d\d:\d\d.\d\d:\d\d:\d\d:\d\d.\d\d:\d\d:\d\d:\d\d/)
	tc_out << line.scan(/\s\s\s\d\d:\d\d:\d\d:\d\d\s(\d\d:\d\d:\d\d:\d\d)/)

end
c=0
clip.delete_at(0)
clip.each do |fuck|
	if clip[c].empty?
		tc_in[c] = []
		tc_out[c] = []
	end
	c=c+1
end

total_frames = 0
tc_in = tc_in.reject(&:empty?)
tc_out = tc_out.reject(&:empty?)
clip = clip.reject(&:empty?)
tc_in.each do |f|
tt_in = String.new
tt_out = String.new
	tt_in = tc_in[i].to_s.scan(/(\d\d)\D(\d\d)\D(\d\d)\D(\d\d)/)
	tt_out = tc_out[i].to_s.scan(/(\d\d)\D(\d\d)\D(\d\d)\D(\d\d)/)
	framecount = ((tt_out[0][0].to_i-tt_in[0][0].to_i)*60*60*60+(tt_out[0][1].to_i-tt_in[0][1].to_i)*60*60+(tt_out[0][2].to_i-tt_in[0][2].to_i)*60+(tt_out[0][3].to_i-tt_in[0][3].to_i))
	framecount = framecount + 20
	tt_in_ff = (tt_in[0][3].to_i*1000/60)
	frames_in = tt_in[0][0].to_i*60*60*60+tt_in[0][1].to_i*60*60+tt_in[0][2].to_i*60+tt_in[0][3].to_i
	frames_in = frames_in - 10
	new_tt_in = Array.new
	new_tt_in[0] = frames_in/60/60/60
	frames_in = frames_in - new_tt_in[0]*60*60*60
	new_tt_in[1] = frames_in/60/60
	frames_in = frames_in - new_tt_in[1]*60*60
	new_tt_in[2] = frames_in/60
	frames_in = frames_in - new_tt_in[2]*60
	new_tt_in[3] = frames_in
	frames_left = (tt_in[0][0].to_i*60*60*60+(tt_in[0][1].to_i)*60*60+(tt_in[0][2].to_i)*60+(tt_in[0][3].to_i))-10
	new_frames = Array.new
	new_frames[0] = frames_left/60/60/60
	frames_left = frames_left - new_frames[0]*60*60*60
	new_frames[1] = frames_left/60/60
	frames_left = frames_left - new_frames[1]*60*60
	new_frames[2] = frames_left/60
	frames_left = frames_left - new_frames[2]*60
	new_frames[3] = frames_left
	tt_in_ff_new = (new_frames[3]*1000/60)

	clip[i][0][0] = clip[i][0][0].chomp("\r")
	path_to_workdir = "'/Volumes/getztron2/April Fool 2016/V'"
	mkdir = "mkdir #{i}\n"
	puts mkdir
	ff_cmd_new = "ffmpeg -ss #{sprintf '%02d', new_frames[0]}:#{sprintf '%02d', new_frames[1]}:#{sprintf '%02d', new_frames[2]}.#{sprintf '%02d', tt_in_ff_new} -i #{path_to_workdir}/#{clip[i][0][0].to_s} -frames:v #{framecount} -c:v copy p.MOV -y"
	puts ff_cmd_new
	puts "./render.sh p.MOV&&\n"
	puts "mv frame*.DNG #{i}/"
	hdmi4k_cmd = "hdmi4k #{path_to_workdir}/frame*[0-9].ppm --ufraw-gamma --soft-film=1.5 --fixrnt --offset=500&&\n"

	ff_cmd2 = "ffmpeg -i #{path_to_workdir}/frame%04d-out.ppm -vcodec prores -profile:v 3 #{clip[i][0][0]}_#{i}_new.mov -y&&\n"
	puts "\n\n\n"
	i=i+1
	total_frames = total_frames + framecount
end

puts "#Total frame: count: #{total_frames}"
Pipe it to a Bash file to have a shell script.
Note from the programmer: This is really unsophisticated and messy. Feel free to alter and share improvements.
8.3 Userspace
Arch Linux comes with systemd, which has one advantage that the boot process is incredible fast. Standard tools such as sshd and dhcpcd have been preinstalled. We may need other tools such as ftp, webserver, etc.
- ftp; I would suggest vsftpd here
- webserver; I am able to modify cherokee with custom C code to directly talk to specific camera sections. Cherokee already powers the WiFi module of the GoPro.
One idea to store camera relevant parameters inside the camera and provide access from most programming languages is to use a database like http://en.wikipedia.org/wiki/Berkeley_DB
8.3.1 Firmware Backup
The entire camera firmware is stored on a Micro SD card plugged into the Microzed. To back up the entire firmware we plug in the Micro SD card into a Linux PC and do the following:
1. Find out which device the micro SD card is:
cat /proc/partitions
mount
should give you a list of all connected devices. Lets assume in our case that the card is /dev/sdc
2. Make sure the card is unmounted (all 3 partitions):
umount /dev/sdc1
umount /dev/sdc2
umount /dev/sdc3
3. clone the entire card to a file:
dd if=/dev/sdc of=sdimage.img bs=4M
Here is a guide that covers doing the same on Mac and Windows: http://raspberrypi.stackexchange.com/questions/311/how-do-i-backup-my-raspberry-pi


