AXIOM Beta/AXIOM Beta Software
1 Misc Scripts
Display voltages and current flow:
./pac1720_info.sh
Output:
ZED_5V        	5.0781 V [2080] 	+29.0625 mV [2e8]   +968.75 mA
BETA_5V       	5.1172 V [20c0] 	+26.6016 mV [2a9]   +886.72 mA
HDN           	3.2422 V [14c0] 	 -0.0391 mV [fff]     -1.30 mA
PCIE_N_V      	3.2422 V [14c0] 	 -0.0391 mV [fff]     -1.30 mA
HDS           	3.2422 V [14c0] 	 +0.0000 mV [000]     +0.00 mA
PCIE_S_V      	3.2422 V [14c0] 	 -0.0391 mV [fff]     -1.30 mA
RFW_V         	3.2812 V [1500] 	 +0.2734 mV [007]     +9.11 mA
IOW_V         	3.2422 V [14c0] 	 +0.0000 mV [000]     +0.00 mA
RFE_V         	3.2812 V [1500] 	 +0.2344 mV [006]     +7.81 mA
IOE_V         	3.2812 V [1500] 	 +0.0781 mV [002]     +2.60 mA
VCCO_35       	2.5000 V [1000] 	 +0.6641 mV [011]    +22.14 mA
VCCO_13       	2.4609 V [ fc0] 	 +1.2500 mV [020]    +41.67 mA
PCIE_IO       	2.4609 V [ fc0] 	 -0.0391 mV [fff]     -1.30 mA
VCCO_34       	2.4609 V [ fc0] 	 +0.8203 mV [015]    +27.34 mA
W_VW          	1.9922 V [ cc0] 	 -0.0781 mV [ffe]     -2.60 mA
N_VW          	3.1641 V [1440] 	 +0.0000 mV [000]     +0.00 mA
N_VN          	1.8750 V [ c00] 	+15.4297 mV [18b]   +514.32 mA
N_VE          	3.1641 V [1440] 	 +0.0000 mV [000]     +0.00 mA
E_VE          	1.9922 V [ cc0] 	 -0.0391 mV [fff]     -1.30 mA
S_VE          	1.9531 V [ c80] 	 +0.0000 mV [000]     +0.00 mA
S_VS          	2.9297 V [12c0] 	 +0.3906 mV [00a]    +13.02 mA
S_VW          	1.9922 V [ cc0] 	 -0.1562 mV [ffc]     -5.21 mA
Read Temperature on Zynq:
./zynq_info.sh
Output:
ZYNQ Temp 49.9545 °C
2 HDMI Output
List of tested AXIOM Beta compatible devices
HDMI is a two-way communication protocol and supports a ton of different formats/frequencies/specs. Many monitors/recorders only support a subset of these formats and expect signals to conform to certain values. These values are not documented publicly so we are currently in the process of debugging device compatibility one by one. The good thing is that its a pure software thing and we can add support and test compatibility with additional devices as we go.
In general we discovered that monitors are more flexible when it comes to HDMI (TMDS) freqencies as they just "tune" into (sync to) the provided clock/data rate. Recorders expect signals to be in a much more stricter/narrow range and will not work (show "no signal") if there is a minor deviation.
Watch this 33C3 talk by Tim Ansell about "Discecting HDMI": https://media.ccc.de/v/33c3-8057-dissecting_hdmi to get insight into how HDMI works.
Settings for VSync, HSync, etc. inside the AXIOM Beta can be found in:
/root/gen_init.sh
For example the Atomos SHOGUN was found to work with these HDMI parameters:
scn_reg  0 2200             # total_w
scn_reg  1 1125             # total_h
scn_reg  2   60             # total_f

scn_reg  4  262             # hdisp_s
scn_reg  5 2182             # hdisp_e
scn_reg  6   45             # vdisp_s
scn_reg  7 1125             # vdisp_e

scn_reg  8    0             # hsync_s
scn_reg  9 2100             # hsync_e
scn_reg 10    4             # vsync_s
scn_reg 11    9             # vsync_e

scn_reg 32  252             # pream_s
scn_reg 33  260             # guard_s
scn_reg 34  294             # terc4_e
scn_reg 35  296             # guard_e
Currently it is not possible to alter TMDS and Clock frequencies from the userspace (requires new FPGA bitstream).
For the firmware there are two modes available, the 30Hz and 60Hz variant. You can switch between them quite easily.
cmv_hdmi3.bit is the FPGA bitstream loaded for the HDMI interface. We use symlinks to switch this file easily.
Before doing this, don't forget to check if the files (cmv_hdmi3_60.bit or cmv_hdmi3_30.bit) really exist in the /root folder.
The output is always in 8bpc RGB color space without subsampling (4:4:4). Not all capture devices can manage this.
Other modes like YCrCb, etc. are currently not supported.
3 Image Processing Nodes
3.1 Debayering
A planned feature is to generate this FPGA code block with "dynamic reconfiguration" meaning that the actual debayering algorithm can be replaced at any time by loading a new FPGA binary block at run-time. This tries to simplify creating custom debayering algorithms with a script like programming language that can be translated to FPGA code and loaded into the FPGA dynamically for testing.
3.2 Peaking Proposal
Peaking marks high image frequency areas with colored dot overlays. These marked areas are typically the ones "in-focus" currently so this is a handy tool to see where the focus lies with screens that have lower resolution than the camera is capturing.
Handy Custom Parameters:
- color
- frequency threshold
Potential Problems:
- there are sharper and softer lenses so the threshold depends on the glass currently used. For a sharp lens the peaking could show areas as "in-focus" if they actually aren't and for softer lenses the peaking might never show up at all because the threshold is never reached
3.3 Image Blow Up / Zoom Proposal
Digital zoom into the center area of the image to check focus.
As extra feature this zoomed area could be moved around the full sensor area.
This feature is also related to the "Look Around" where the viewfinder sees a larger image area than is being output to the clean-feed.
This re-sampling method to scale up/down an image in real-time can be of rather low quality (nearest neighbor/bilinear/etc.) as it is only for preview purposes.
4 Tools
4.1 cmv_reg
Get and Set CMV12000 image sensor registers (CMV12000 sports 128x16 Bit registers).
Details are in the sensor datasheet: https://github.com/apertus-open-source-cinema/beta-hardware/tree/master/Datasheets
Examples:
Read register 115 (which contains the analog gain settings):
cmv_reg 115
Return value:
0x00
Means we are currently operating at analog gain x1 = unity gain
Set register 115 to gain x2:
cmv_reg 115 1
4.2 Setting Exposure Time
To set the exposure time use the cmv_snap3 tool with -z parameter (this will tell the software to not save the image):
./cmv_snap3 -e 9.2ms -z
Note: The exposure time can be supplied in "s" (seconds), "ms" (milliseconds), "us" (microseconds) and "ns" (nanoseconds). Decimal values also work (eg. "15.5ms").
4.3 mat4_conf.sh
Read the details about the Matrix Color Conversion math/implementation.
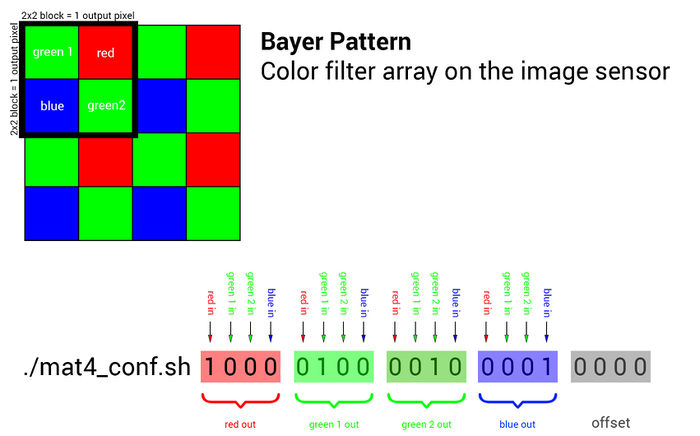
To set the 4x4 color conversion matrix, you can use the mat4_conf.sh script:
The default configuration:
./mat4_conf.sh 1 0 0 0 0 1 0 0 0 0 1 0 0 0 0 1 0 0 0 0
Please note that in current AXIOM Beta firmware the mat4 order is changed and the default matrix is:
./mat4_conf.sh 0.3 0.3 0.3 0.3 0 0 0 1 0 0.42 0.42 0 1 0 0 0
This will be changed to reflect the documentation again soon.
With the Black Magic Video Assist (BMVA), a nicer matrix (ie better skin color, less greenish):
./mat4_conf.sh 0.3 0.3 0.3 0.3 0 0 0 1 0 0.3 0.3 0 1 0 0 0
This 4x4 conversion matrix is a very powerful tool and allows to do things like mixing color channels, reassigning channels, applying effects or doing white balancing.
TODO: order is blue, green, red!
4.3.1 4x4 Matrix Examples:
./mat4_conf.sh  1 0 0 0  0 1 0 0  0 0 1 0  0 0 0 1    0 0 0 0   # unity matrix but not optimal as both green channels are processed separately
./mat4_conf.sh  1 0 0 0  0 0.5 0.5 0  0 0.5 0.5 0  0 0 0 1    0 0 0 0   # the two green channels inside each 2x2 pixel block are averaged and output on both green pixels
./mat4_conf.sh  0 0 0 1  0 1 0 0  0 0 1 0  1 0 0 0    0 0 0 0   # red and blue are swapped
./mat4_conf.sh  1 0 0 0  0 1 0 0  0 0 1 0  0 0 0 1    0.5 0 0 0    # red 50% brigther
./mat4_conf.sh  1 0 0 0  0 1 0 0  0 0 1 0  0 0 0 1.5    0 0 0 0    # blue multiplied with factor 1.5
./mat4_conf.sh  .25 .25 .25 .25  .25 .25 .25 .25  .25 .25 .25 .25  .25 .25 .25 .25    0 0 0 0    # black/white
./mat4_conf.sh  -1 0 0 0  0 -0.5 -0.5 0  0 -0.5 -0.5 0  0 0 0 -1    1 1 1 1    # negative
4.4 Clipping
scn_reg 28 0x00 # deactivate clipping
scn_reg 28 0x10 # activate low clipping
scn_reg 28 0x20 # activate high clipping
scn_reg 28 0x30 # activate high+low clipping
4.5 Image Histogram
To read and output histogram data from the Betas live images a tool called cmv_hist3 is available inside the AXIOM Beta.
./cmv_hist3 -h
This is ./cmv_hist3 V1.4
options are:
-h        print this help message
-s        acquire snapshot
-b <num>  number of bins
-d <num>  decimation factor
-r <num>  number of rows
-C <prc>  center sample area
-B <val>  register mapping base
-S <val>  register mapping size
The output in 12 bit mode (default) are values in 4096 lines and 4 columns (R, G, B, GB channels)
5 General Info
Stop HDMI live stream:
fil_reg 15 0
Start HDMI live stream:
fil_reg 15 0x01000100
5.1 Operating System
At this moment we were able to reuse an Arch Linux image for the Zedboard on the Microzed. To do so, some software such as the FSBL and uboot were added. More information can be found here: http://stefan.konink.de/contrib/apertus/ I will commit myself on the production of a screencast of the entire bootstrap proces from the Xilinx software to booting the MicroZed.
I would suggest running Arch Linux on the AXIOM Beta for development purposes. If we need to shrink it down that will be quite trivial. Obviously we can take the embedded approach from there, as long as we don't fall in the trap of libc implementations with broken threading.
Pattern noise correction:
--rnfilter=1 : FIR filter for row noise correction from black columns
--rnfilter=2 : FIR filter for row noise correction from black columns
and per-row median differences in green channels
--fixrn : Fix row noise by image filtering (slow, guesswork) --fixpn : Fix row and column noise (SLOW, guesswork) --fixrnt : Temporal row noise fix (use with static backgrounds; recommended) --fixpnt : Temporal row/column noise fix (use with static backgrounds) --no-blackcol-rn : Disable row noise correction from black columns
(they are still used to correct static offsets)
--no-blackcol-ff : Disable fixed frequency correction in black columns
Flat field correction: --dchp : Measure hot pixels to scale dark current frame --no-darkframe : Disable dark frame (if darkframe-xN.pgm is present) --no-dcnuframe : Disable dark current frame (if dcnuframe-xN.pgm is present) --no-gainframe : Disable gain frame (if gainframe-xN.pgm is present) --no-clipframe : Disable clip frame (if clipframe-xN.pgm is present) --no-blackcol : Disable black reference column subtraction
                     - enabled by default if a dark frame is used
                     - reduces row noise and black level variations
--calc-darkframe : Average a dark frame from all input files --calc-dcnuframe : Fit a dark frame (constant offset) and a dark current frame
                     (exposure-dependent offset) from files with different exposures
                     (starting point: 256 frames with exposures from 1 to 50 ms)
--calc-gainframe : Average a gain frame (aka flat field frame) --calc-clipframe : Average a clip (overexposed) frame --check-darkframe : Check image quality indicators on a dark frame
Debug options: --dump-regs : Dump sensor registers from metadata block (no output DNG) --fixpn-dbg-denoised: Pattern noise: show denoised image --fixpn-dbg-noise : Pattern noise: show noise image (original - denoised) --fixpn-dbg-mask : Pattern noise: show masked areas (edges and highlights) --fixpn-dbg-col : Pattern noise: debug columns (default: rows) --export-rownoise : Export row noise data to octave (rownoise_data.m) --get-pixel:%d,%d : Extract one pixel from all input files, at given coordinates,
and save it to pixel.csv, including metadata. Skips DNG output.
</nowiki>
Example:
./raw2dng --fixrnt --pgm --black=120 frame%05d.dng
6 Tutorials / Guides / Research / Topics
AXIOM Beta Firmware - Done
Installing a webserver on AXIOM Beta - Done
Wifi Access Point Setup - Done
AXIOM Beta as photography camera - Done
Factory Calibration - Done
Sensor Cleaning - Done

