Difference between revisions of "Chronomotion"
| Line 10: | Line 10: | ||
= Chronomotion Usage Details = | = Chronomotion Usage Details = | ||
==General Information== | |||
The head uses DC motors with optical encoders on both axis. It will maintain its knowledge of its current axis position until the head looses power (running out of batteries or turning it off). | |||
The optical encoders are light sensitive so leaving the battery cover open and letting light from the outside fall onto the motor will lead to problems with the encoded position. | |||
The encoders on both axis are extremely accurate (16777216 steps for one turn[360°]) with one step accounting for just 0.000021°. The heads internal GOTO commands (which Chronomotion triggers) are far less accurate with around 0.2° though. | |||
A Chronomotion controlled GOTO routine could be implemented that would achieve far higher accuracy though at slower positioning speed. So far the accuracy provided by the heads internal GOTO commands was more than enough for shooting repeatable timelapse motion control sequences though. | |||
Chronomotion shoots time lapse sequences in Shoot-Move-Shoot (SMS) mode only. Continous motion modes could be implemented if there is the requirement though. | |||
== Establishing a Connection == | == Establishing a Connection == | ||
| Line 20: | Line 32: | ||
You should see Serial commands being sent and received in Terminal. This means everything connected properly and you can use all other buttons/commands. | You should see Serial commands being sent and received in Terminal. This means everything connected properly and you can use all other buttons/commands. | ||
==Manual/Quick Motion== | |||
[[File:Quickmotion.jpg]] | |||
=For Developers= | |||
https://gitorious.org/apertus/chronomotion | https://gitorious.org/apertus/chronomotion | ||
Revision as of 13:43, 28 March 2013
Chronomotion Website: http://www.apertus.org/en/chronomotion
1 Requirements
- Merlin/Orion/Skywatcher remote head
- Computer/Laptop able to run JAVA
- Serial cable with TTL voltage level converter (plus USB to Serial converter) to connect Merlin/Orion/Skywatcher remote head to your computer
2 Installation
Chronomotion Installation Guide
3 Chronomotion Usage Details
3.1 General Information
The head uses DC motors with optical encoders on both axis. It will maintain its knowledge of its current axis position until the head looses power (running out of batteries or turning it off).
The optical encoders are light sensitive so leaving the battery cover open and letting light from the outside fall onto the motor will lead to problems with the encoded position.
The encoders on both axis are extremely accurate (16777216 steps for one turn[360°]) with one step accounting for just 0.000021°. The heads internal GOTO commands (which Chronomotion triggers) are far less accurate with around 0.2° though.
A Chronomotion controlled GOTO routine could be implemented that would achieve far higher accuracy though at slower positioning speed. So far the accuracy provided by the heads internal GOTO commands was more than enough for shooting repeatable timelapse motion control sequences though.
Chronomotion shoots time lapse sequences in Shoot-Move-Shoot (SMS) mode only. Continous motion modes could be implemented if there is the requirement though.
3.2 Establishing a Connection
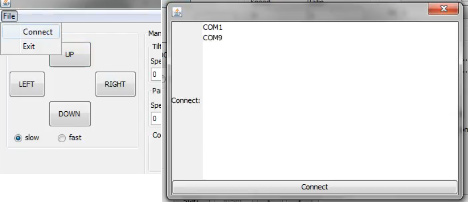
Go to:
File->Connect
Select a COM port (in my case COM9 is the USB Serial adapter) and press the "Connect" Button.
You should see Serial commands being sent and received in Terminal. This means everything connected properly and you can use all other buttons/commands.
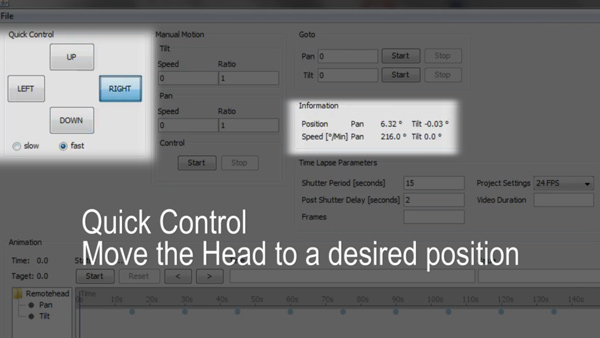
3.3 Manual/Quick Motion

