PCB Component Footprint Validation Procedure
From apertus wiki
1 Preparations
- Install Eagle Freeware edition: http://www.cadsoftusa.com/download-eagle/ and choose "Freeware license" when running it for the first time. (OSX Experience: you need to start it twice in freeware mode)
- Download *.brd,*.sch and library archive of a project PCB
- Open the *.brd or *.sch file in Eagle and go to File -> Export -> Partlist
- Save the partlist as text file and add it to the wiki page of that PCB
2 Verification
2.1 Footprint validation
- pick a part to validate from the partlist, ("0402" components are standard SMD parts and the footprint will likely be just fine, more important are the non standard parts)
- Google for the datasheet of the component with entire partnumber
- Most of the time either the manufacturers website or the distributors (farnell, RS, digikey, mouser) will offer them for download.
- Add the datasheet URL to the partlist table
- In Eagle go to Library -> Open and select the first library from the archive
- Once the library window opened go to Library -> Package and choose the one matching the one in the partlist
- Now the actual checks begin:
- Check if the pitch & position of all pads matches the specifications in the datasheet
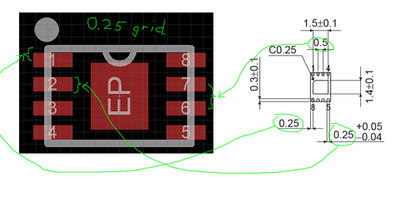
- For through-hole parts check if all pins are fully surrounded by pads (green) - SMD components have red SMD pads
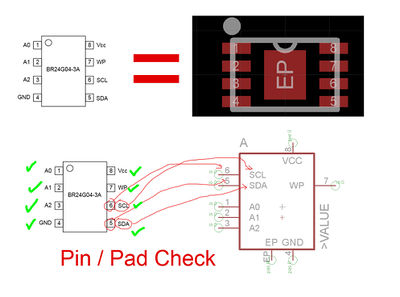
- check if the pin numbering/naming (under "Device") is matching the datasheet
- Check if the pitch & position of all pads matches the specifications in the datasheet


2.2 Component Selection
- for parts that have no value defined yet check the recommendations and research matching parts
- For guidance on part selection specifics ask Bertl on IRC. (optimally provide him with PCB version/revision identification and partlist numbers so he knows exactly what you are talking about)
- search for alternative equivalent parts
- help us find the best price from mouser, digikey, farnell, RS, etc.