AXIOM Remote/Development
1 Introduction
Currently Axiom Remote Development kit has 3 main components,
- AXIOM Remote
- PICkit
- FT4232H mini- module
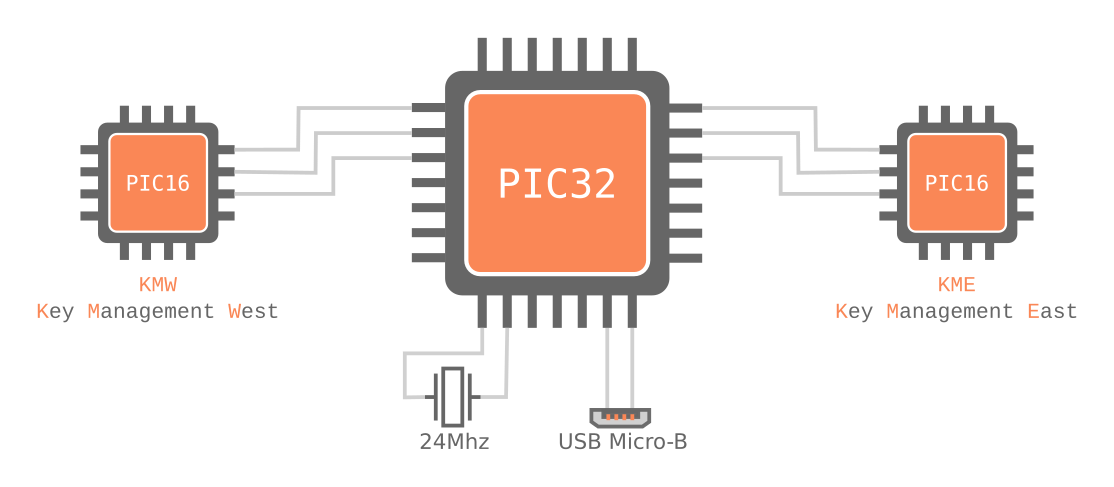
This page provides information for the connection and setting up the AXIOM Remote and its components. You will also read about flashing process of PIC32 and two PIC16s on AXIOM Remote.
2 PICkit Connection
2.1 Steps to connect and flash AXIOM Remote Firmware with PICkit
- Connect the six-pin cable between PICkit and ICSP port on AXIOM Remote.
Note: Make sure that pin 1 (indicated by white arrow on PICkit) of the wire is connected to pin 1 (indicated by white arrow at ICSP port) at the ICSP port on the AXIOM Remote. - Use pic32prog to flash the hex file to the AXIOM Remote.
Acquire the binary or source code to build from: https://github.com/sergev/pic32prog
Usage example:./pic32prog AXIOM_Remote_Firmware.hex
Output:
Programmer for Microchip PIC32 microcontrollers, Version 2.0.204
    Copyright: (C) 2011-2015 Serge Vakulenko
      Adapter: PICkit2 Version 2.32.0
    Processor: MZ2048ECG100
 Flash memory: 2048 kbytes
  Boot memory: 80 kbytes
         Data: 171496 bytes
        Erase: done
Program flash: ########################################### done
 Program boot: ### done
 Verify flash: ########################################## done
  Verify boot: ## done
 Program rate: 3450 bytes per second
Note: press the reset button on AXIOM Remote after the flash progress is complete in pic32prog.
If wire connection is proper and still getting :
No target found
Try running it with sudo , If it works with sudo, it is a permission issue.
Add the user to the plugdev group and add the following udev rule to /etc/udev/rules.d/26-microchip.rules and reboot.
ATTR{idVendor}=="04d8", MODE="664", GROUP="plugdev"
you can get the idVendor by lsusb. In case of PICkit2 , it will look something like
Bus 003 Device 008: ID 04d8:0033 Microchip Technology, Inc. PICkit2
3 UART Connection
Any UART to USB adapter should work. We use an FT4232H adapter that is available from distributors for around 28€. You require a USB-A to USB-Mini-B cable to connect the FT4232H to your computer and 3 dupont cables to connect the FT4232H to the AXIOM Remote.
3.1 FT4232H Pinout


Chip Datasheet: https://ftdichip.com/wp-content/uploads/2020/08/DS_FT4232H.pdf
Mini Module Datasheet: https://www.ftdichip.com/Support/Documents/DataSheets/Modules/DS_FT4232H_Mini_Module.pdf
3.2 FT4232H wiring
FT4232H features 4 UART ports, in this example we utilize port C. Under Linux the FT4232H should simply show up as ports /dev/ttyUSB0 to /dev/ttyUSB3 where port C from the above example would correspond to /dev/ttyUSB2.
Note that the Transmit (TXD) and Receive (RCD) lines need to be cross wired meaning TXD needs to be connected to RXD and RXD to TXD. You can choose any GND pin though.
| Name | FT4232H pin | Remote pin |
|---|---|---|
| GND | GND | GND |
| TXD | CD0 | RXD |
| RXD | CD1 | TXD |


4 JTAG connection
4.1 FT4232H wiring
5 dupont cables are required to hook up JTAG to the FT4232H.
| Name | FT4232H pin | Remote pin |
|---|---|---|
| GND | GND | GND |
| TCK | AD0 | TCK |
| TDI | AD1 | TDI |
| TDO | AD2 | TDO |
| TMS | AD3 | TMS |


4.2 Flashing
It is possible to flash the PIC32 firmware through pic32prog and FT2232H and FT4232H adapters (amongst others, like PICkit3). Multiple devices which use FT2232H are already supported in pic32prog, but not FT4232H. We've forked pic32prog, added FT4232H support and adjusted the build to reduce problems there.
https://github.com/apertus-open-source-cinema/pic32prog
Usage example:
./pic32prog -s 1500 -S AXIOM_Remote_Firmware_635.hex
Output:
Programmer for Microchip PIC32 microcontrollers, Version 2.0.258
    Copyright: (C) 2011-2015 Serge Vakulenko
      IDCODE=5510e053
      Adapter: Generic FT4232H adapter
    Processor: MZ2048ECG100
 Flash memory: 2048 kbytes
  Boot memory: 80 kbytes
         Data: 135904 bytes
        Erase: .......done
Program flash: ################################## done
 Program boot: ### done
 Program rate: 35484 bytes per second
Note: Don't forget to press reset button after flashing, as by default reset (MCLR) will be hold by the programmer.
4.3 Debugging
Our tests with OpenOCD and FT4232H were only partially successful, PIC32 could be accessed, resetted and halted, also registers and disassembled code inspected, but breakpoints could not be set properly or were not stopping the execution. Luckily there is a tool called ejtagproxy, which can be used instead of OpenOCD. Also the connection from gdb-multiarch is working properly and breakpoints are stopping the execution.
ejtagproxy supports same devices as pic32prog. We've forked ejtagproxy' too and added FT4232H support.
https://github.com/apertus-open-source-cinema/ejtagproxy
Note: Use gdb-multiarch which is able to debug MIPS targets.
Start ejtagproxy:
./ejtagproxy
Output:
GDB proxy for Microchip PIC32 processors, Version 1.0.36
Copyright (C) 2012 Serge Vakulenko

EJTAGproxy comes with ABSOLUTELY NO WARRANTY; for details
use '--warranty' option. This is Open Source software. You are
welcome to redistribute it under certain conditions. Use the
'--copying' option for details.

ejtagproxy: waiting on TCP port 2000
Start gdb-multiarch':
gdb-multiarch
Connect to ejtagproxy:
target extended-remote localhost:2000
or
tar ext :2000
Load symbol file (to see the names of function where the target was halted, instead of addresses, and to be able to set breakpoints via names and not only addresses):
file <path to .elf file>
Example
file /home/dev/Projects/Firmware/build/AXIOM_Remote_Firmware_635.elf
Some useful commands:
| Command | Short form | Description |
|---|---|---|
| reset | r | Reset target (PIC32) |
| CTRL+C | Halt the target | |
| continue | c | Resume execution after halt |
| break PollButtons | b PollButtons | Set breakpoint on function PollButtons |
| break 0x9d001f73 | b 0x9d001f73 | Set breakpoint on address 0x9d001f73 |
| info breakpoints | i b | Show set breakpoints |
| delete | del or d | Delete all breakpoints |
| delete breakpoint 3 | del 3 or d 3 | Delete breakpoint 3, see 'info breakpoints' |
| info registers | i r | Show available registers and their values |
4.3.1 Debugging in VSCode
TODO
5 Flashing PIC16 Firmware
There are no exposed connections to ICSP pins of the PIC16s, they are tied to the PIC32 pins. We use our custom protocol for flashing PIC16s through UART connection.
5.1 Steps to Flash East and West PIC16s
Prerequisite : Make sure the UART connection to AXIOM Remote is proper. UART connection can be checked in the serial console using any Serial Communication Program such as minicom.
-
Using PICkit flash AXIOM Remote with our custom PIC32MZ ICSP Serial Interface.
Link to PIC32MZ ICSP Serial Interface firmware hex file: http://vserver.13thfloor.at/Stuff/AXIOM/REMOTE/icsp_ser_v2.hex
If need to modify or compile the hexfile, link to source code : http://vserver.13thfloor.at/Stuff/AXIOM/REMOTE/icsp_ser_v2.c - We provide custom protocol, which can be used to flash East and West PIC16s using UART. Link to ICSP Programmer : http://vserver.13thfloor.at/Stuff/AXIOM/REMOTE/ser_icsp6_prog.c
Above protocol needs to be compiled sperately for East and West PIC16s. Both devices can be selected using argument -DSEL_WEST and -DSEL_EAST, while compiling.-
For East PIC16, Compile the icsp6_prog.c with -DSEL_EAST and name the output accordingly, like ser_icsp6_prog_east
gcc -o ser_icsp_e ser_icsp6_prog.c -DSEL_EAST
-
For West PIC16, Compile the icsp6_prog.c with -DSEL_WEST and name the output accordingly, like ser_icsp6_prog_west
gcc -o ser_icsp_w ser_icsp6_prog.c -DSEL_WEST
-
For East PIC16, Compile the icsp6_prog.c with -DSEL_EAST and name the output accordingly, like ser_icsp6_prog_east
-
Using the output from icsp6_prog.c, flash the east and west PIC16s with their respective firmware, through UART's serial device port.
- For East PIC16 , Link to Firmware of East PIC16 : http://vserver.13thfloor.at/Stuff/AXIOM/REMOTE/remote_e.hex
Below is how command to flash will look like if, if UART's serial device port is /dev/ttyUSB2 and output of ICSP programmer for East PIC16 is named as ser_icsp6_prog_east./ser_icsp6_prog_east /dev/ttyUSB2 remote_e.hex
- For West PIC16 , Link to Firmware of West PIC16 : http://vserver.13thfloor.at/Stuff/AXIOM/REMOTE/remote_w.hex
Below is how command to flash will look like if, if UART's serial device port is /dev/ttyUSB2 and output of ICSP programmer for West PIC16 is named as ser_icsp6_prog_west./ser_icsp6_prog_west /dev/ttyUSB2 remote_w.hex
- For East PIC16 , Link to Firmware of East PIC16 : http://vserver.13thfloor.at/Stuff/AXIOM/REMOTE/remote_e.hex